
Google gave us the best use case for virtual reality by quietly putting the whole world within our reach with its Google Earth VR platform last year. The technology let you walk around your favorite cities or ‘teleport’ to the top of a mountain range in a jiffy, soaring through the sky like a bird!
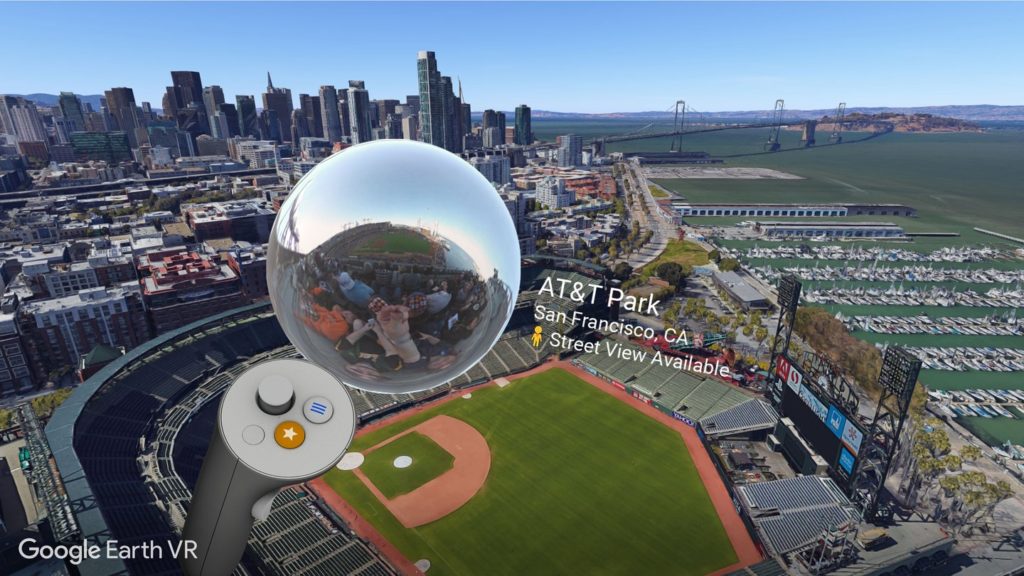
And just when you thought this experience could not be any more amazing, Google picked up a bunch of Street View imagery and threw it into the mix! So now, if you point the controllers of your HTC Vive or Oculus Rift virtual reality headsets closer to the ground level, you may catch the ‘Street View available’ icon.
Dive right in, because you will be taken inside an immersive 360° photo which has been taken either by the Street View team or crowdsourced from other users around the globe (just like you see in Google Maps). This is what it’s going to look like:
Quite something, isn’t it? Right now, Google has made imagery from 85 countries available in this feature. Google recommends you start with fun spots like the AT&T Park in San Francisco, or head to Croatia to explore the King’s Landing from Game of Thrones (seen above).
Don’t own a VR headset?
Relax, you can still check out Street View in VR with your phone by downloading the Street View app for Daydream (Android) and Cardboard (iOS and Android), though we are hoping that Google adds more support for the platform soon. Bon voyage!

#Business


Next article


 It’s a great feeling when you’ve finally decided that you will learn how code your first web map! You’re excited and ready to get going. Then, when you do a little bit of research…
The reality strikes: there’s so much to learn! Right? “It’s really hard!” you might think and…Well, just do nothing. Here, I will debunk some of the most common myths about coding web maps that will help you move forward. Along the way, I will share with you my favourite tools to make your life easier as you embark on this exciting journey! Let’s get started:)
Myth #1: Coding web maps is exactly the same as coding any other web application and it’s hard.
Coding web maps can be easier than coding most web applications because a lot of the time you can get a fully functional web mapping application without help of any code that runs on a web server.
What’s wrong with running code on a web server? Absolutely nothing. It’s just a steep learning curve for most beginners. And you just don’t always need all of the features of a web application in your web map. Here’s what you don’t need. Especially at the beginning:
You don’t need to get your data from a database (more about that in myth #2) or have editing or login capabilities for example. You can get a pretty useful web map without all that.
It will save you a lot of time (and frustrations) to start with a simple version of your web map. And then, once you see your web map working…and get a pretty good motivational kick out if, you will be ready to learn how to use all those other features.
As a beginner, you have to focus your whole attention on learning what you can do with a simple web page and a little bit of Javascript code (and here’s a clue: you can do a lot with just that:). No web server code needed.
But, of course you will be tempted to go to the “dark side” because your spatial data is probably in some kind of database…
And that brings me to the next myth:
Myth #2: I need to get data for my web map from a database.
It’s ok to have it as an end goal, but it will take you more time that it’s worth at the beginning. And the reasons is simple: you need to go the web server to make that happen. Or use a map server. The truth is that you don’t need to do that at the beginning. Here’s why:
A lot of beginners are quite surprised to know that they can get their whole spatial dataset into a web map code. Yes, inside an actual web page. Really?
Yes, it’s because everything becomes faster. Our devices, internet connections, browsers and even web mapping libraries are becoming faster. So, you might be surprised to find out that your data is not a big as you might think.
You also have plenty of other options to store and serve your spatial data instead of using a database. For example, you can use a cloud service or a map server. But, unless you’ve already have access to them and know how to use them, don’t start there! It will slow your down. Keep it simple, put your spatial data into your web map code! Ok, back to the actual process of coding web maps, next myth is..
Myth #3: I need to become an HTML & CSS & Javascript expert.
Here again, coding maps can be a much easier than coding a web application. First, you can safely forget about CSS when you’re starting out. CSS is just a way to describe, how a web page element should look like. But, when you use a modern Javascript web mapping library (every web map does) a lot of styling is done for you.
Of you course, if you need more customisation you will eventually need to get into it. But, for now. Don’t worry about it. What about HTML? You need a very little HTML and a simple web page template for your web map.
This is again, where the most work is done by Javascript web mapping libraries. And that brings me to the last technology: Javascript.
Yes, you need to learn how to use it. But, the good news is that you will learn it just by using a specific web mapping library. It’s much easier to do that rather than just trying to learn Javascript without any context.
It’s just good old learning by doing. And, for most beginners, it works really well. Let’s move to myths about the tools of a web mapping trade, next myth is…
Myth #4: I need to use a “professional” code editor.
This is a big one. A lot of people get really stuck here. There are endless choices here. Some with very advanced features and sometimes a price tag too. But, to be honest with you, you don’t need any special piece of software to write your code (I know, I keep repeating myself;).
You can even do that in Notepad. That’s fine. The only key feature that I see is very beneficial for beginners is syntax highlighting. This is a feature that will colour a different parts of your code into different colours.
And one of code editors that has this feature and is very simple to use is a code editor called atom. And yes, it’s free. If you can’t decide which editor to choose, just use atom and be done with it. And once you code you web map it’s time to… Yes, share it with the world, which brings me to the next myth:
Myth #5: I need to buy a web hosting account to publish my web map.
When you buy a hosting account, you will get a place on some web server where you can put your web pages and web applications. The main reason why you need to pay for most hosting accounts is that you have access to plenty services you can use.
But, since, hopefully, I’ve convinced you that for your first web map you don’t need a database and all this code on a web server you can use a perfectly fine free options. One of them is 000webhost’s free web hosting account, it’s quite easy to use and totally free.
That’s it!
I hope, that I’ve helped you overcome some of the problems that you might have getting started with coding web maps.
What’s your biggest problem with getting started with coding web maps? Tell me in the comments below!
If you are ready to actually code your first web map, let me help you with that with those free video tutorials.